Getting Started in Link-Live Cloud Service
To start, create a user account at Link-Live.com, and sign in. You can open the Link-Live website in the AirCheck G3's web browser to create and manage your account.
Claiming the Unit
On Link-Live.com
-
The first time you sign in to Link-Live.com, a pop-up window appears, prompting you to claim a device.
-
Select the AirCheck G3 image, and follow the claiming instructions on the Link-Live website.
If you already have a user account and other devices claimed to Link-Live, navigate to the Units page from the left side navigation drawer, and then click the Claim Unit button  at the lower right corner of the screen.
On the AirCheck G3 Unit
-
Open the Link-Live app. Your unit's MAC address is displayed.
-
Tap CLAIM NOW on the Link-Live app screen.

On Link-Live.com
-
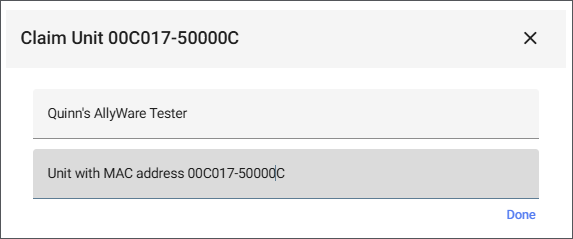
When prompted by the instructions on the Link-Live website, enter the MAC address from your tester unit.
-
Click Listen, and wait for the claiming process to complete.
-
Enter any desired changes to the unit's name or description, and then click Done.
On your tester unit, the main Link-Live App Screen displays information about your claimed tester.
After Claiming
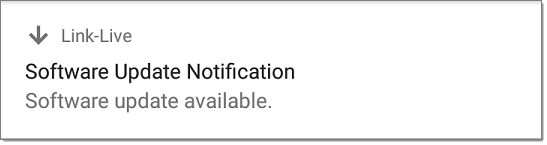
After you claim your AirCheck G3 to Link-Live, a software update may be available. If so, a notification appears in the Status Bar  . Open the Top Notification Panel, and select the notification to update your unit. See Updating Software for more information.
Once your AirCheck G3 is claimed to the Link-Live Cloud Service, testing app results are automatically uploaded to your Link-Live organization. See Automatic Upload Settings.
Within the testing applications, you can also attach test-specific comments and images to your test results. See Uploading Test Results and Files.
If your AirCheck G3 is not connected to an active network, any test results, comments, or images are stored in memory (buffered) and uploaded once a connection is established. See Buffered Uploads.
For more information on how to the use the Link-Live.com website, click or tap the navigation menu icon ![]() at the top left of the Link-Live.com pages, and select
at the top left of the Link-Live.com pages, and select  .
.
Unclaiming
You may need to unclaim your unit from Link-Live to transfer it to another user or if you no longer want to send data to Link-Live.com.
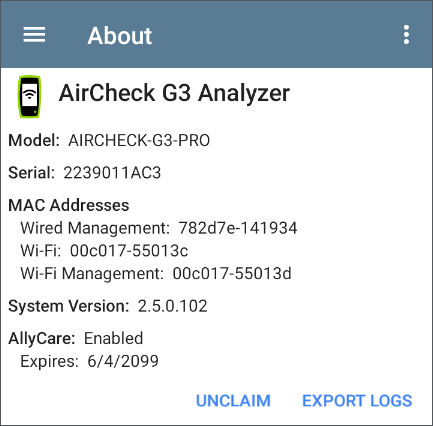
To unclaim your AirCheck G3 from Link-Live, tap the navigation drawer icon ![]() in the Link-Live app, tap About, and then tap UNCLAIM.
in the Link-Live app, tap About, and then tap UNCLAIM.
AllyCare Code
The AllyCare Code button appears at the bottom of the About screen next to the Export Logs button if your unit is not claimed.

Tap AllyCare Code to open a dialog to enter an AllyCare Activation Code.
See Registering and Activating AllyCare Support.
Private Link-Live Settings
You can disable Link-Live Cloud and enable Private/On-Premise Link-Live settings on the Feature Access screen. Once Link-Live Public is disabled in Feature Access, Private Link-Live Settings become available in the Link-Live app navigation drawer. Use these settings only when your organization has deployed a private instance of Link-Live. Consult your IT organization for setting details. Find the Link-Live Private User Guide online at netally.com/support/user-guides.