Install and Start-Up
 NOTE
NOTE
The start script is OS-specific. Use sudo ./ubuntu-start.sh on Ubuntu and ./rhel-start.sh on RHEL.
All other scripts live in the toolkit/ folder and have plain names. Run them with sudo on Ubuntu and without sudo on RHEL.
See Script Naming and Usage.
Obtaining Software and Keyfile
Follow the instructions from you NetAlly Order Fulfillment Acknowledgement to download the Link-Live Private Software and Keyfile.
Downloading Files
The Software Downloads page builds the correct installation bundle from a few questions about the target machine. Separate bundles are produced for each operating system, for each supported Ubuntu version, and for new installations as opposed to updates, so answer the questions before downloading.
-
Go to the public Link-Live.com and create an account.
-
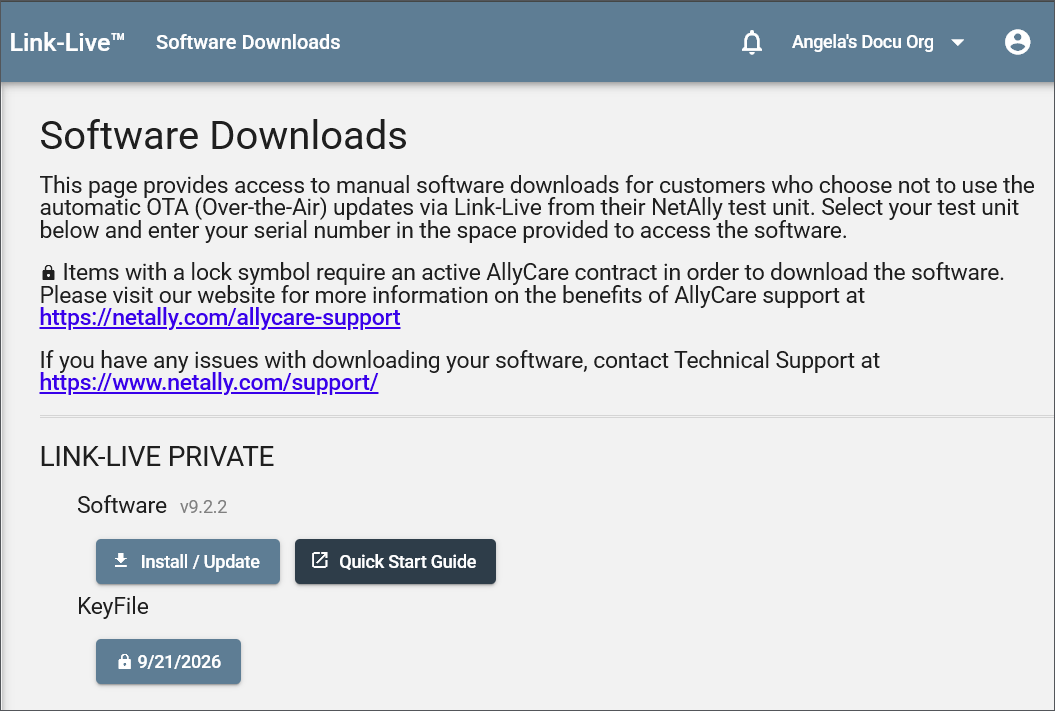
In the left-side menu, navigate to Support > Software Downloads, and scroll down to Link-Live Private.
-
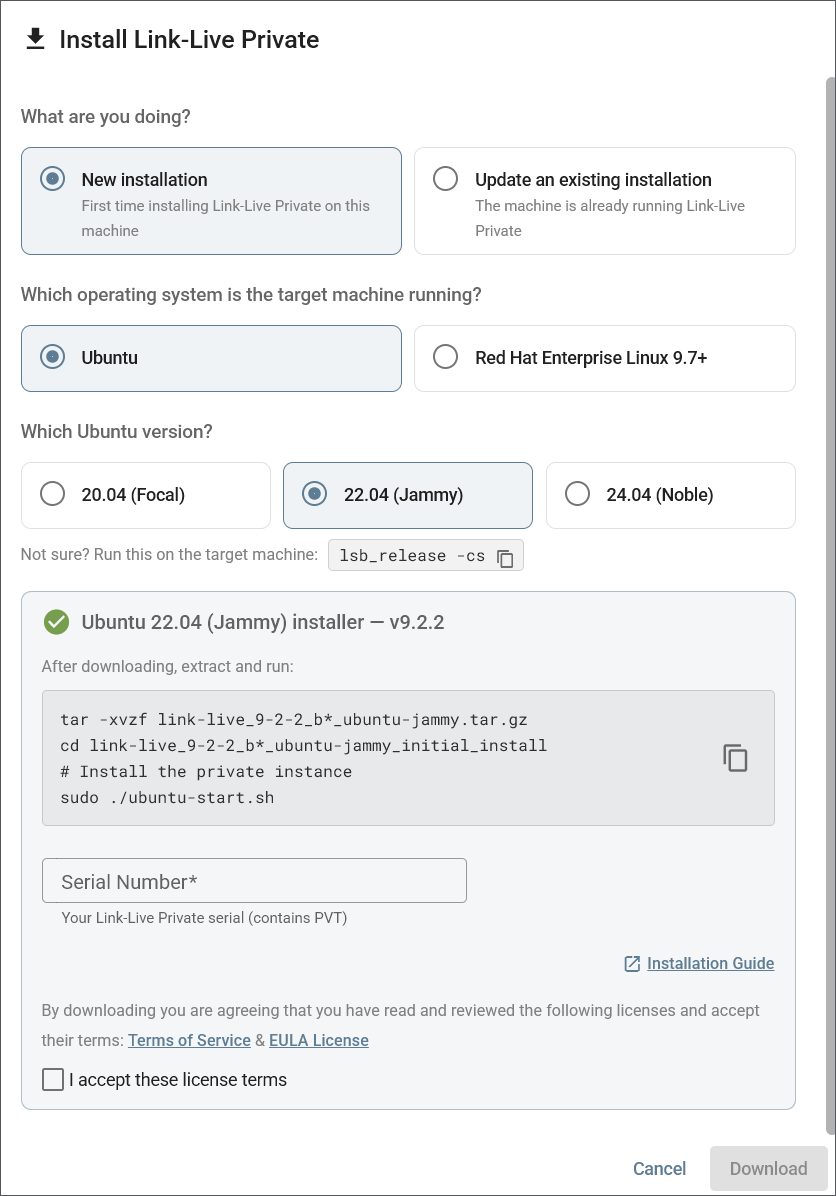
Select Install / Update to open the Install Link-Live Private dialog.
-
Under What are you doing?, select one:
-
New installation – First time installing Link-Live Private on this machine.
-
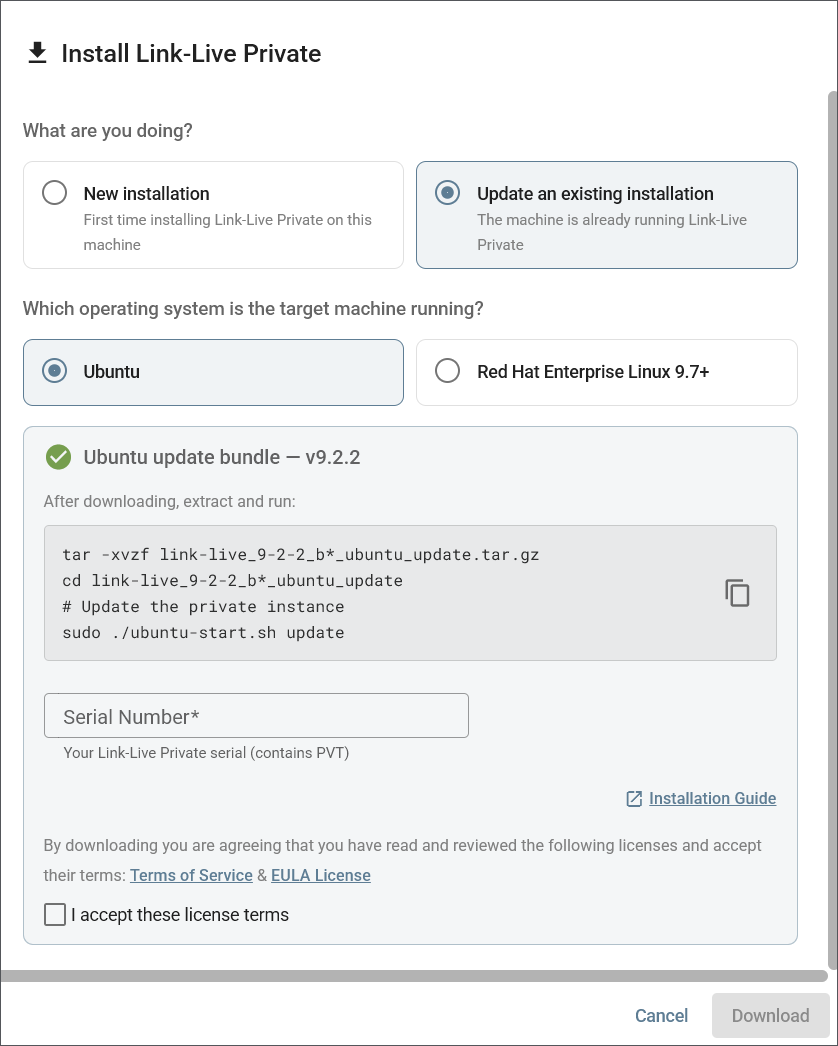
Update an existing installation – The machine is already running Link-Live Private.
-
-
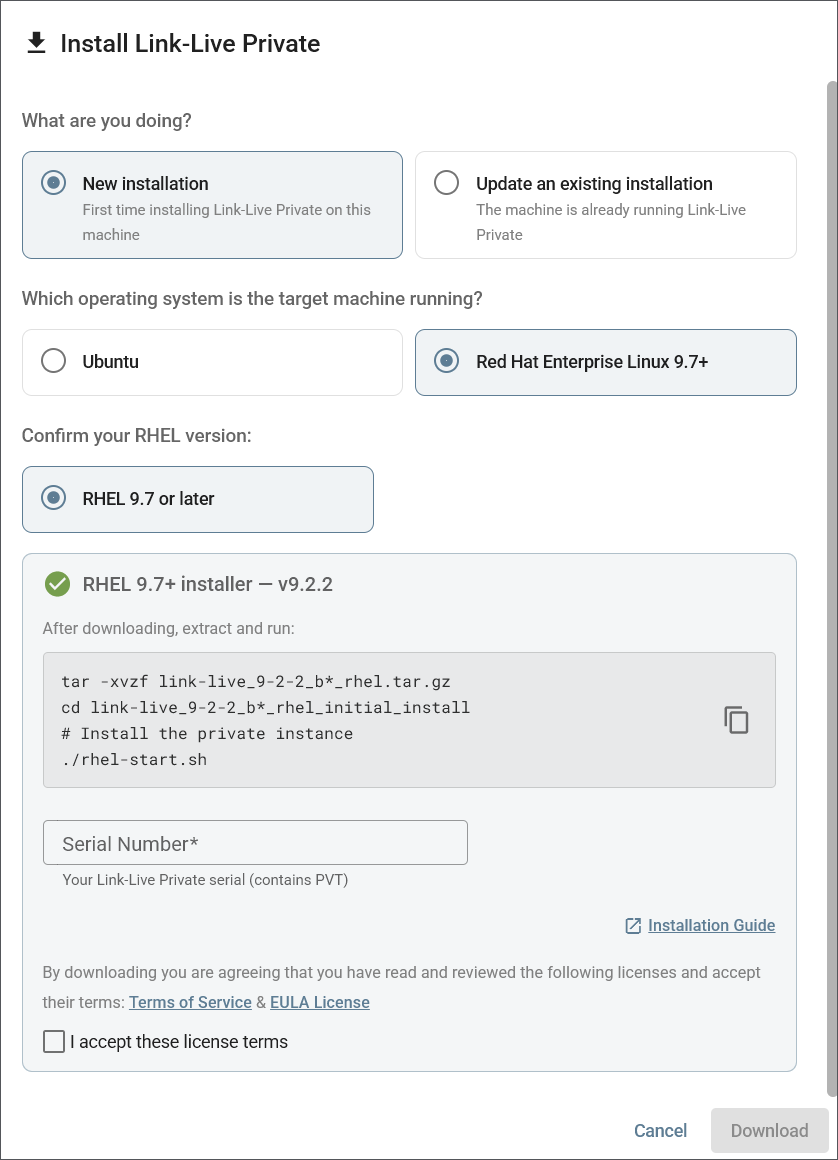
Under Which operating system is the target machine running?, select Ubuntu or Red Hat Enterprise Linux 9.7+.
-
Identify the version of that operating system. This step appears only for a new installation, because a single update bundle covers every supported version:
-
Ubuntu – Select 20.04 (Focal), 22.04 (Jammy), or 24.04 (Noble). To confirm which version the target machine runs, run
lsb_release -cson that machine. -
Red Hat Enterprise Linux – Select RHEL 9.7 or later.
-
-
Review the panel that appears. It names the bundle your selections produce, along with the version it contains, and lists the commands to extract and run it. Select the copy icon to copy those commands.
NOTE! If the panel reports that the bundle was not built for this release, change your selections or contact NetAlly Support. -
Enter your Serial Number. The Link-Live Private serial contains
PVT. -
Review the licenses listed in the panel, then select I accept these license terms.
-
Select Download.
Download the Keyfile separately, from the same Link-Live Private section of the page. Both the software bundle and the Keyfile are needed to install your private instance of Link-Live.
Available Bundles
Your selections in the dialog produce one of the following bundles:
|
Selections |
Bundle |
|---|---|
|
New installation, Ubuntu 20.04 |
Ubuntu 20.04 (Focal) installer |
|
New installation, Ubuntu 22.04 |
Ubuntu 22.04 (Jammy) installer |
|
New installation, Ubuntu 24.04 |
Ubuntu 24.04 (Noble) installer |
|
New installation, RHEL |
RHEL 9.7+ installer |
|
Update an existing installation, Ubuntu |
Ubuntu update bundle |
|
Update an existing installation, RHEL |
RHEL update bundle |
NOTE! A single update bundle covers every supported Ubuntu version, while new installations use a bundle built for one specific version. Selecting Update an existing installation therefore skips the Ubuntu version question.
To install an update once it is downloaded, see Manage and Update.
Extracting Files
The name of the tar.gz file you receive includes the version and build number of your release, so it changes with every release. In the examples below, <version> stands in for that part of the name. To check the version you are running, see version.txt at the root of the installation directory.
On Ubuntu, the recommended location for the installation directory is /opt. Installing elsewhere works, but ubuntu-start.sh prints a warning naming /opt as the recommended location before continuing normally.
On RHEL, extract the bundle into a directory your regular user owns, such as your home directory. /opt is owned by root, and rhel-start.sh runs as your regular user, not root.
-
In the terminal, extract the
tar.gzfile provided into/opton Ubuntu or your home directory on RHEL. The bundle file name ends with the platform it was built for, so the Ubuntu name carriesubuntu-focal,ubuntu-jammy, orubuntu-nobleto match the release you selected:Ubuntu:
sudo tar -xvzf link-live_<version>_ubuntu-jammy.tar.gz -C /optRHEL:
tar -xvzf link-live_<version>_rhel.tar.gz -C ~NOTE: Extracting an installer bundle adds
_initial_installto the folder name, so the folder does not match thetar.gzfile name exactly. Update bundles extract to a folder matching the file name.The extracted folder should contain the following:
-
nginx/– NGINX configuration and the default self-signed certificates. -
docker-images/– Container images and the software installed by the start script. -
db-migrations/– Database migration scripts, applied automatically. -
firmware/– Tester firmware shipped with this release. -
toolkit/–backup.sh,restore.sh,cert-renew.sh, andexport-logs.sh. On RHEL, this folder also containsregister-service.sh. -
docker-compose.yml– Container definitions. RHEL uses this same file, becausepodman-composereads it directly. -
version.txt– The Link-Live Private version contained in this bundle. -
README.md -
ubuntu-start.shorrhel-start.sh– The start script, and the only script at the root of the folder.
NOTE: Only the start script carries an operating system prefix. Every other script sits in
toolkit/under a plain name, because the bundle you received is already built for your platform. Thedocker-imagesdirectory is never prefixed; it has that name on both Ubuntu and RHEL. -
-
Move into the new installation directory. For example:
Ubuntu:
cd /opt/link-live_<version>_ubuntu-jammy_initial_installRHEL:
cd ~/link-live_<version>_rhel_initial_install -
Run the start script for your operating system:
Ubuntu:
sudo ./ubuntu-start.shRHEL:
./rhel-start.shYour system will provide a series of prompts to complete installation.
Setting Up your Environment
The start script prompts you for each setting it needs, including the host address that users and tester units will connect to.
 CAUTION! At the host prompt, do not enter
 127.0.0.1 or localhost.
Enter the server's real IP address or DNS hostname, the same address you will configure on your tester units. This one value is used by three different things, and a loopback address only works for one of them:
|
Used by |
Requires |
|---|---|
|
Your web browser |
An address reachable from your computer. |
|
Link-Live Private internal services |
An address reachable from inside the application. |
|
Tester units |
An address routable on your network. |
If you enter 127.0.0.1, the web interface still appears to work when you browse to it from the server itself, but uploaded files (including AirMapper surveys) remain stuck on Processing indefinitely, and tester units cannot upload at all. See Troubleshoot.
-
An environment file is created as part of setup. Rerunning the start script loads the corresponding environment configuration automatically. The file is saved at
/etc/link-live/ll.envon Ubuntu and~/.config/link-live/ll.envon RHEL. -
Run the script with the same user and permissions each time to avoid access issues.
Auto-Start on Boot (RHEL)
On RHEL, rhel-start.sh configures Link-Live Private to start on boot and to keep running after you log out. It does this at the end of every install and every update, so no additional steps are required.
Two things are set up for you:
-
Session lingering – Keeps your containers running after you log out of SSH.
-
A systemd user service – Named
linklive.service, this starts the containers when the server boots.
To confirm either one, run these commands as your normal user. Never use sudo.
systemctl --user status linklive.service
loginctl show-user $USER --property=Linger
Other useful commands:
systemctl --user restart linklive.service # Restart the containers.
systemctl --user disable linklive.service # Turn off start-on-boot.
journalctl --user -u linklive.service # View service logs.
Superuser Account Creation
The user and password variables are used on container startup to create a superuser account, which is necessary for the application to function correctly.
-
Use your superuser account to upload a new keyfile, create OTA unit updates, and for uploading Android applications.
-
Do not change the password on this account through the Link-Live UI, use it to claim units, or for other routine Link-Live functionality. You should instead create a new account via the "Create account" link on the login screen, or, if that button is disabled, by inviting users to an organization.
-
If you need to change the password on the super account, run
sudo ./ubuntu-start.sh authon Ubuntu or./rhel-start.sh authon RHEL.
Server Information and SSL/TLS Certificates
When Link-Live Private is started without any NGINX template configuration, it serves on port 443, with the NGINX container managing certificates. Note that the NGINX container binds that port to the host machine automatically.
-
Link-Live Private serves on port 443 with NGINX handling SSL certificates. Port 80 is not used, and there is no redirect from HTTP, so browse to
https://explicitly.
-
Either supply the path to your certificate and key while the start script runs, or replace default certificates in
nginx/certswith your own trusted SSL certificate.NOTE: Failing to replace these will result in port 443 using invalid, self-signed certificates.
-
Obtain an official SSL certificate by registering a domain (e.g., mycompany.com) with a certificate provider.
NOTE: Ensure you do not have
www.in your host name. For example,Link-Live-Private.mycompany.com.
-
To update certificates without restarting, run the
cert-renew.shscript in thetoolkitfolder:Ubuntu:
sudo ./toolkit/cert-renew.shRHEL:
./toolkit/cert-renew.shThis script, like the start script, optionally prompts you to supply paths to certificate files. If you have replaced the files manually, skip that prompt. It will then restart the NGINX container for you, with the new instance utilizing the new certificate files.
-
If desired, see the NGINX configuration template at
nginx/templates/default.conf.templateto implement your own certificate management strategy.
NOTE: NetAlly does not provide support for custom NGINX configurations.