Test and Management Ports
The LinkRunner AT has two wired RJ-45 copper ports and a fiber port, each with specific test or management functions described in this section.
NOTE: LinkRunner AT 1500 does not include a fiber port.

See the sections below for more information on the ports. Also see Buttons and Ports and the technical Specifications as needed.
 CAUTION! Review the Network Security recommendations before connecting your tester to any network, and always follow your organization’s security policies.
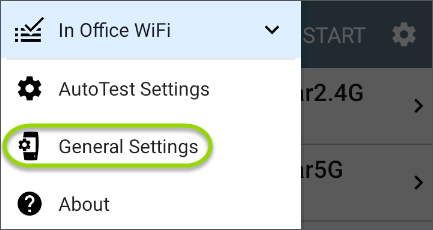
Test ports can be disabled and enabled in the LinkRunner AT General Settings.
Test Ports
![]() Wired Copper Test Port: The copper test port is the RJ-45 port on the top of the unit. To disable, unplug the connection.
Wired Copper Test Port: The copper test port is the RJ-45 port on the top of the unit. To disable, unplug the connection.
![]() Wired Fiber Test Port: (Not included on LinkRunner AT 1500) The SFP and fiber test port is also on the top of the unit. To disable, unplug the connection.
Wired Fiber Test Port: (Not included on LinkRunner AT 1500) The SFP and fiber test port is also on the top of the unit. To disable, unplug the connection.
NOTE: If both the top fiber and copper ports are connected to an active network, the LinkRunner AT uses the fiber link as the Wired Test Port connection.
LinkRunner AT runs
Run an AutoTest Wired Profile to establish a link on the Wired test interface.
If the AutoTest app is not currently open, the last Wired Profile in the profile list runs automatically when you power on the unit or LinkRunner AT detects a new copper link in the top Wired Test Port. Wired fiber connections must be started manually in the AutoTest app.
Test Port Settings
The General Settings affect how you can use the test port. These settings are accessible from the left-side navigation drawer in most NetAlly testing apps.
 Management Port
 USB Wired Management Port: You can use a USB-to-Ethernet adapter to run an alternative wired management port for your LinkRunner AT.
This option allows you to set up a stable wired connection for system updates, updating software, communicating with Link-Live, AP uplinks, and for running basic wired tests that can help diagnose problems that may affect Wi-Fi devices.
USB Wired Management Port: You can use a USB-to-Ethernet adapter to run an alternative wired management port for your LinkRunner AT.
This option allows you to set up a stable wired connection for system updates, updating software, communicating with Link-Live, AP uplinks, and for running basic wired tests that can help diagnose problems that may affect Wi-Fi devices.
NOTE: NetAlly has tested many but not all USB-to-Ethernet adapters for compliance with the LinkRunner AT. The following adapters are supported:
-
j5create model JUE130 (USB 3.0)
-
StarTech.com model USB21000S
For the latest information, see Ethernet Adapters and Cameras.
Contact NetAlly support for more details if needed.
To set up the adapter interface:
-
Plug the adapter into one of the USB Type A ports on your device.
-
Connect the adapter to a network RJ-45 cable.
-
Verify that the LEDs on the adapter are on. This indicates that the connection is active.
-
Verify that the USB Wired Management Port is now listed as a management port in the Test and Port Status Notifications.
You can now use the USB Wired Interface in the following applications:
- Discovery (Active Discovery Ports and TCP Port Scan)
- Ping
- Path Analysis
See Selecting Ports below for more information.
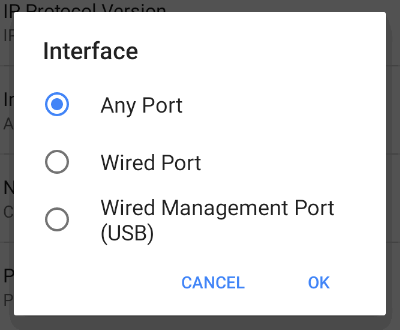
Selecting Ports
Some of the individual NetAlly testing apps let you select which port interface to use for tests or analysis.
To change the port, tap an app's settings icon ![]() to display the settings screen. Then tap Interface to select the port from a dialog.
to display the settings screen. Then tap Interface to select the port from a dialog.