Connecting to Wi-Fi
Basic connectivity to Wi-Fi is handled by the Wi-Fi Management Port (configured in the system network settings).
NOTE: NetAlly testing apps use the Wi-Fi Test Ports and Wi-Fi AutoTest Profiles to connect to Wi-Fi networks during testing. See Test and Management Ports for more information.
NOTE: The AirCheck G3 can also support a wired Ethernet port if you use a supported external USB-to-Ethernet adapter, which you must purchase separately. See USB Wired Management Port for more information.
 CAUTION! Wi-Fi Security Notice: Connect only to Wi-Fi networks protected by WPA2 or higher encryption. Avoid open or unsecured networks, as unencrypted Wi-Fi may expose your device, test data, and credentials. Use caution with public or guest Wi-Fi, and verify the SSID before connecting to prevent joining lookalike networks. Never enter sensitive information or credentials on untrusted networks. Follow your organization’s IT security policies when connecting to Wi-Fi.
To connect your AirCheck G3 to a Wi-Fi network:
-
Open the system Wi-Fi Device Settings using either method below:
-
Open the device Wi-Fi settings from the main Device Settings screen by tapping the Settings icon
 and selecting Network & Internet > Wi-Fi.
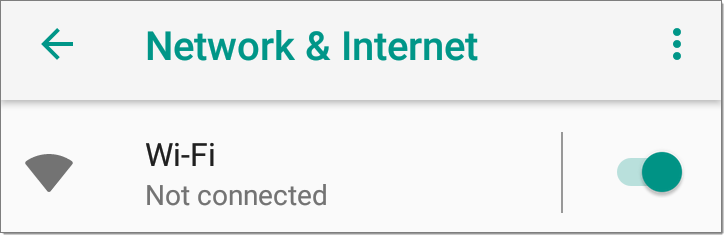
-
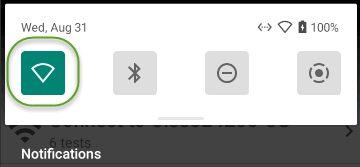
Open device Wi-Fi settings from the Quick Settings panel by dragging down the top Status Bar and tapping and holding (long pressing) the Wi-Fi icon.
Either method opens the Wi-Fi settings screen:
-
-
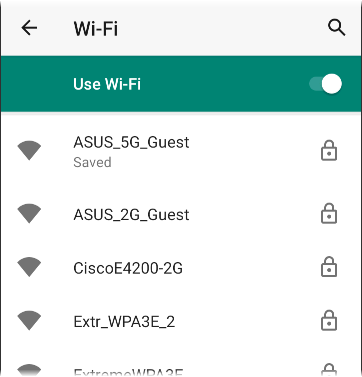
Ensure the Wi-Fi feature is On.
-
Tap an available Wi-Fi network in the list.
-
Enter the network's security credentials. (Most networks only require a password, but depending on the security settings, some may also require a company username, EAP type, authentication type, certificate, or other credentials.)
-
Tap CONNECT.
The network you selected moves to the top of the list, and your connection status is displayed below its name in device and quick settings.
The Status Bar displays the Wi-Fi status icon  at the top right of the screen.
Captive Portals
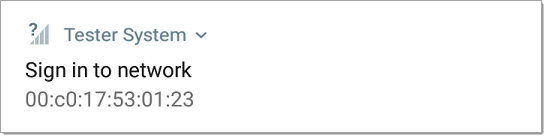
When you try to connect to a network with a Captive Portal requirement, this system notification icon  appears in the top Status Bar. Drag down from the top of the screen to open the notification.
Tap the notification to open a web browser window where you can enter the required information for the captive portal. When finished, you can access the internet through the connected network.
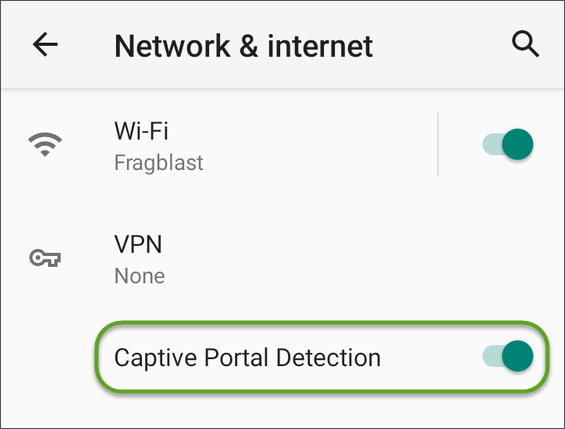
If you are trying to connect to a network with a captive portal, but the system notification is not appearing, check that the Captive Portal Detection setting is enabled in Device Settings > Network & Internet.
Configuring for Enterprise Security
Enterprise security requirements for WPA/WPA2/WPA3 Enterprise now require a CA certificate file to be imported to your tester. Some EAP types also require a client certificate and key. This procedure assumes that you are trying to connect to an AP using WPA2-E with PEAP.
- Before You Begin
- Import the Certificate Authority File
- Test Wi-Fi Management Using WPA2-E with PEAP
- Import the Client Certificate
Before You Begin
You may depend on your IT department to provide authorization certificates, which may be created by a Trusted Root Authority like VeriSign or DigiCert. If so, contact your IT department for the certificate resources. You will need:
-
CA certificate in .pem format
-
Clients:certificates in .p12 format with private key (EAP TLS only)
-
Common name, domain name, username, and password for the server you to which you want to connect.
If you have the ability to generate your own self-signed certificates, such as a FreeRADIUS server, you can create these resources as needed. This procedure uses examples generated by a FreeRADIUS server as a certificate source, although other sources are available.
Import the Certificate Authority File
-
Copy the self-signed Certificate Authority (CA) file (in .pem format) onto a USB thumb drive.
-
Transfer the USB thumb drive to your AirCheck G3, and then copy the .pem file to the Downloads folder.
-
Open the Settings app.
-
Navigate to Security > Encryption & credentials > Install a certificate > Wi-Fi certificate. This opens the file picker.
-
Navigate to the Downloads folder, and select the .pem file that contains your CA certificate.
-
Rename this certificate (for example, CA FreeRadius self-signed). A message confirms that the Wi-Fi certificate has been installed.
-
(Optional) Verify the CA certificate installed correctly:
-
Tap the system BACK button to return to Encryption & credentials.
-
Tap User credentials.
-
Verify that the name of your CA file (for example, CA FreeRadius self-signed) is displayed.
-
-
If you are creating your own certificate:
-
Verify the common name for the enterprise server. For example, using a FreeRADIUS server, create a common name of Example Server Certificate by entering:
sudo -scd /etc/freeradius/certsopenssl x509 -in server.pem -text | grep Subject |
grep CNOutput:
Subject: C=FR, ST=Radius, O=Example Inc., CN=Example Server Certificate emailAddress=
admin@example.org -
On the same server, create a user login to access the enterprise server. For example, with a FreeRADIUS server, you would edit /etc/freeradius/users, locate the section for "# The canonical testing user", and then create the new user by inserting 2 lines:
entuser1 Cleartext-Password := "randompw"
Reply-Message := "Hello, %{User-Name}"
This creates a user login called entuser1 with a password of randompw.
-
Test Wi-Fi Management Using WPA2-E with PEAP
-
Open the Settings app on your unit and navigate to Network & internet.
-
Toggle the Wi-Fi button to On/Enabled.
-
Tap Wi-Fi to view available networks.
-
Scroll down to and then select the SSID of the enterprise server you wish to connect to using WPA2-E (for example, TEST-Ruckus-WPA2-E).
-
Configure the following WPA2-E options in the pop-up dialog:
-
EAP method: PEAP
-
Phase 2 authentication: MSCHAPV2
-
CA certificate: (use whatever name you chose for your CA certificate, for example, CA FreeRadius self-signed)
-
Online Certificate Status: Do not validate
-
Domain: (enter the Common Name recorded above, for example, Example Server Certificate)
-
Identity: (enter whatever test user name was set up for the server, for example, entuser1)
-
Anonymous identity: (leave blank)
-
Password: (enter the password set up for the server)
-
-
Tap the CONNECT button to apply settings and close the configuration page.
-
Verify that the test SSID appears at the top of the list with a status of Connected.
Import the Client Certificate
NOTE: Applies to EAP TLS only.
-
Obtain a client certificate in .p12 format. Be sure it includes the private key.
NOTE: Although the imported CA certificate is a .pem file, NetAlly recommends a .p12 file format for the client certificate. Below is a sample openssl command to convert a client certificate from .pem to .p12 format:
<path_to_openssl_bin>\openssl.exe pkcs12 -legacy -provider-path <openssl_path>/providers -export
-inkey <privateKey>.key
-in <client_cert>.pem
-out <client_cert>.p12 -
Rename the certificate file, for example, client.p12.
-
Copy the .p12 file to a USB thumb drive.
-
Transfer the USB thumb drive to your AirCheck G3, and then copy the .p12 file to the Downloads folder.
-
Open the Settings app.
-
Navigate to Security > Encryption & credentials > Install a certificate > Wi-Fi certificate. This opens the file picker.
-
Navigate to the Downloads folder, and select the .p12 file that contains your client certificate (for example, client.p12). A message prompts you to enter the password.
-
Enter the client certificate password to extract the certificate.
-
Rename the certificate, for example, FreeRadius client. A message confirms that the Wi-Fi certificate has been installed.
-
(Optional) Verify the client certificate installed correctly:
-
Tap the system BACK button to return to Encryption & credentials.
-
Tap User credentials.
-
Verify that the name of your client certificate file (for example, FreeRadius client) is displayed.
-
-
Press the system BACK button to return to Encryption & credentials. You can now securely connect to your enterprise server.