Basic Wired Testing With Link-Live Pairing
Link-Live allows you to add several simple wired tests by pairing a NetAllyLinkSprinter or Test Accessory with your AirCheck G3. This ability lets you run wired tests and view the results on your unit. For example, you may wish to make sure that an AP is getting adequate PoE and basic connectivity while performing a Wi-Fi survey or running other Wi-Fi tests. The wired data is uploaded to Link-Live and then shared to your AirCheck G3 to give you more complete information.
Tests available are:
- Power Over Ethernet (PoE)
- Wired link verification
- DHCP link verification
- Gateway detection
- Link-Live access verification
- (LinkSprinter only) Wi-Fi availability
You can also view the information on Link-Live, which includes supplemental information fields.
Before You Begin
-
You must have a Test Accessory iPerf Tester or a LinkSprinter Pocket Network Tester. To acquire one of these devices, contact your netally.com representative or visit: netally.com
-
Read the user guide available for your product, available at: https://www.netally.com/support/user-guides/
Link-Live Setup
-
Log into your Link-Live account. (You can use a PC or start the Link-Live app on your AirCheck G3 and then select the OPEN LINK-LIVE.COM option.)
-
Make sure your AirCheck G3 is claimed to Link-Live.
-
Using the same Link-Live organization to which you claimed your AirCheck G3, claim your Test Accessory or LinkSprinter as per the instructions in the documentation.
-
Select the Units option from the left-side menu. This displays your claimed devices.
-
Select your AirCheck G3. (On a PC, you can use the filter icons at the top of the list.) This displays your device information.
-
Scroll down until you see the Pair Unit heading.
-
Tap or click on the Pair Unit toggle button next to the Test Accessory or LinkSprinter that you want to pair with your unit.
-
Turn off your Test Accessory or LinkSprinter and unplug its Ethernet wire connection.
Run the Paired Test and View Results
To run a paired wiring test:
-
With your Test Accessory or LinkSprinter turned off, plug the Ethernet cable connection that you want to test into the test port. (All test LEDs activate for a few seconds, and then the PoE icon LED
 remains on if there is adequate power from the connection.)
 -
Wait about 90 seconds for a test to complete. All five LEDs turn green if the tests are successful. The test results are uploaded to Link-Live and then shared with your AirCheck G3.
-
To view the results on your AirCheck G3:
-
Wait for the paired test icon
 to appear on the system notification bar.
 -
Swipe down from the top of the screen to view the notifications list.
-
Locate and tap on the down arrow for the notification from Link-Live that shows a new result from your Test Accessory or LinkSprinter.
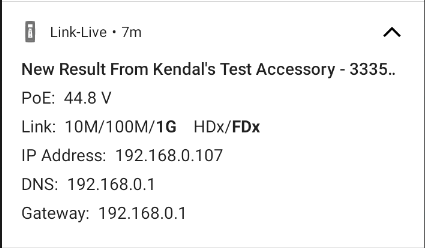
- PoE voltage is listed.
- Bold fields in the Link details show actual speed and duplex.
- The IP Address is the DHCP IP.
- The DNS is the primary server (DNS 1).
- Ping times to reach google.com are not included.
NOTE: Successive tests replace the data in the notification.
-
-
To view the results on a PC:
-
In Link-Live, select the Results option from the left-side menu. This displays your test results for all your claimed devices.
-
Select the results you want for the paired Test Accessory or LinkSprinter from the list. (On a PC, you can use the Search function to look for specific devices, folders, etc.) This displays the same information as the AirCheck G3 system notification described above, but it adds additional information fields:
- Link polarity
- DHCP subnet mask
- Gateway ping time and public IP address
- Ping time for google.com
- (LinkSprinter only) Information on the nearest switch (switch name, model, IP/MAC address, port number, and type)
-