Wi-Fi Profile Settings
These settings control which network is tested, how the CyberScope Air connects, thresholds for Success/Warning/Fail results and trending graphs indications, and any user-added test targets.
To configure the profile settings, tap the settings icon  on the Wi-Fi Profile screen, or add a new Wi-Fi Profile to AutoTest.
In this Topic
Advanced Wi-Fi Connection Settings
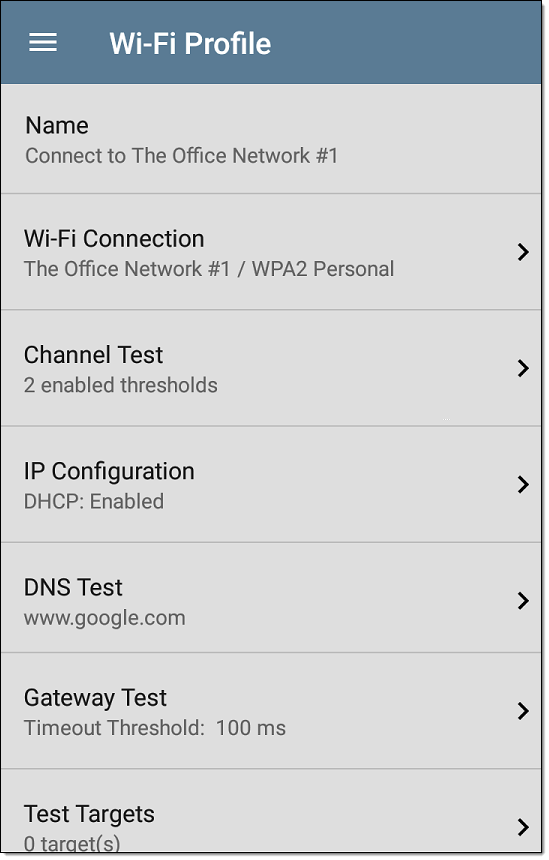
On the Wi-Fi Profile settings screen, tap each field described below as needed to configure the profile. Changed settings are automatically applied.
NOTE: If you add a new Wi-Fi profile from the Wi-Fi Analysis app, the Profile Name, SSID, and Authentication type are auto-populated. See Creating a Wi-Fi Profile from the Wi-Fi Analysis App.
When you finish configuring, tap the back button  to return to the profile.
Name
Tap the Name field to enter a custom name for the profile. This name appears on the main AutoTest screen profile card and the Wi-Fi profile screen header.
 Wi-Fi Connection Settings
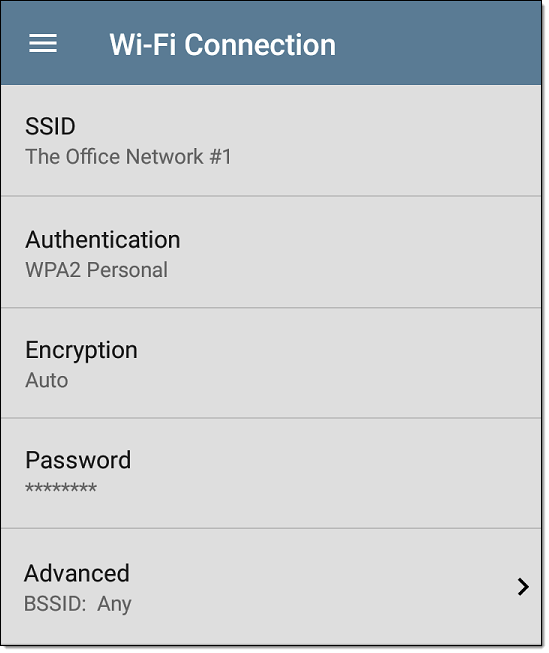
Open Wi-Fi Connection settings to configure network IDs, security credentials, and test thresholds for the Link test. These settings control the Wi-Fi Test Port connection.
SSID
Tap to enter an SSID or select from the list of discovered SSIDs. If you do not enter a custom Name for the Profile, the SSID is displayed as the Wi-Fi Profile's name.
Authentication
If you selected an SSID from the drop-down list of discovered SSIDs in the setting above, or created a "Connect to [SSID]" profile from the Wi-Fi app, the Authentication type is automatically selected. If needed, tap to open the Authentication dialog and select the correct security type for the network.
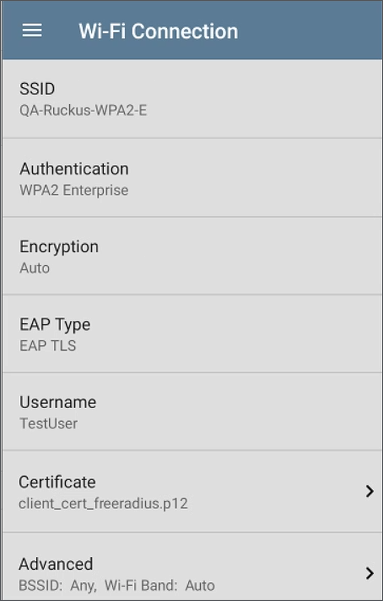
The following settings depend on the Authentication type. Enter all necessary credentials for the network security type, such as Encryption, Keys, EAP type, username, certificate, and/or password.
WEP Key
This setting appears if the Authentication type is WEP Shared or WEP Auto. Tap to select the correct key type (ASCII or Hex) and enter the key.
Encryption
Tap to select an encryption type if needed. The default is "Auto."
EAP Type
This setting appears if the Authentication type is WPA/WPA2/WPA3 Enterprise. The default is PEAP MSCHAP V2. Tap to select a different EAP type if needed.
Username
This field appears along with multiple authentication types. Tap the Username field to enter your username.
Certificate
This setting appears if you selected one of the following EAP types: EAP TLS, PEAP TLS, or TTLS EAP TLS.
Tap to open the Certificates screen.
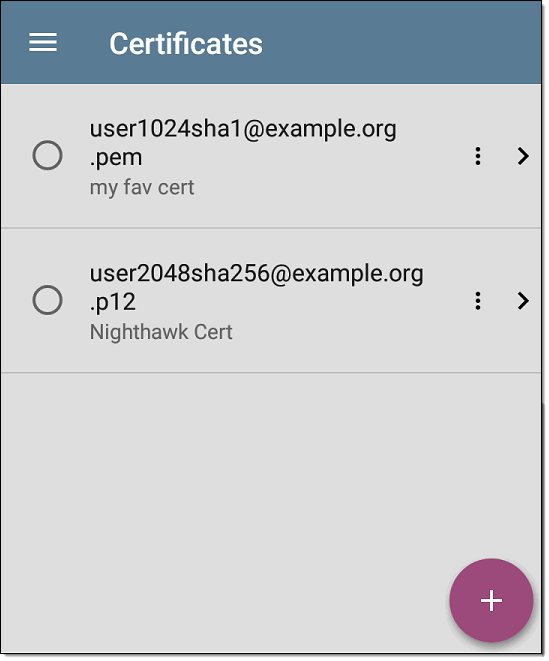
This screen displays all the certificates that have been imported to AutoTest via the Wi-Fi Profile settings.
-
Tap the radio button to the left of an imported certificate to select and use it with the current Profile.
-
Tap a certificate's row to edit its name and description.
-
Tap the action overflow icon
 to Delete an imported Certificate.
 -
Tap the floating action button (FAB)
 to import a new certificate file.
CyberScope Air supports these certificate file extensions:
- .pem
- .p12
- .cer
- .crt
The imported certificate feature is meant for client authentication and must include the private key. The CS Air supports 1-way client authentication only; mutual authentication, Server, and CA/Root certificates are not supported. While CS Air can perform a key exchange, it does not authenticate the server certificate.
Password
This field appears along with multiple security types. Tap the Password field to enter the network password.
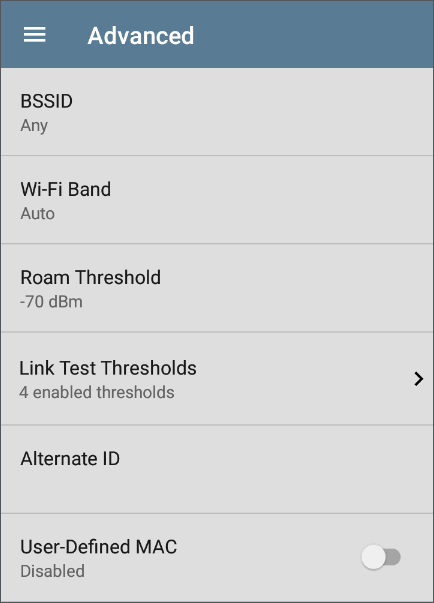
Advanced (Wi-Fi Connection) Settings
BSSID
Enter or select a specific BSSID for the Wi-Fi Profile to prevent the CS Air from roaming or linking to any other BSSID.
Wi-Fi Band
Tap this setting to specify the wireless band(s) on which the Wi-Fi Profile attempts to connect. The default setting of Auto allows the unit to connect on any band. Note that the Profile fails to link if this setting conflicts with the selected bands in General Settings.
Roaming Aggressiveness
This setting controls how quickly your tester switches between access points (APs) on the same network. The setting determines the signal strength (dBm) at which the tester starts looking for a stronger AP and, if found, disconnects from the current AP and reconnects to the stronger one. Tap to select: Low, Normal, or High.
-
Low: Reluctant to roam; stays connected longer, even if the signal weakens.
-
Normal: Balances stability and responsiveness.
-
High: Eager to roam; switches more quickly to stronger APs.
Link Test Thresholds
Open the Link Test Thresholds screen to adjust the values that determine Success/Warning/Fail grading for the following measurements.
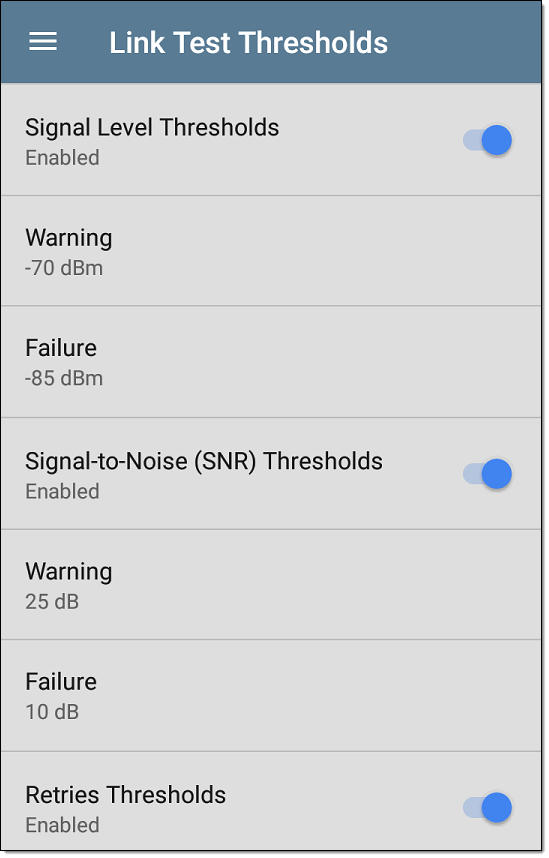
Tap each field to select a new value or enter a custom one. Each threshold also has a toggle button that allows you to disable grading based on that measurement entirely.
Signal Level Thresholds: Measured signal from the AP
Signal-to-Noise (SNR) Thresholds: Ratio of measured AP signal to noise level detected on the channel
Retries Thresholds: Retry frames as a percentage of total transmitted frames
Transmit Rate (TX) Thresholds: Measured rate as a percentage of the AP's maximum throughput rate
Alternate ID
Enter an Alternate ID if necessary. This is an Advanced Authentication setting.
User-Defined MAC
This feature can help with tasks such as testing ACL lists (for example, finding out if specific MAC addresses are allowed on the network) or determining if specific IPv4 addresses should be assigned to specific MAC addresses.
-
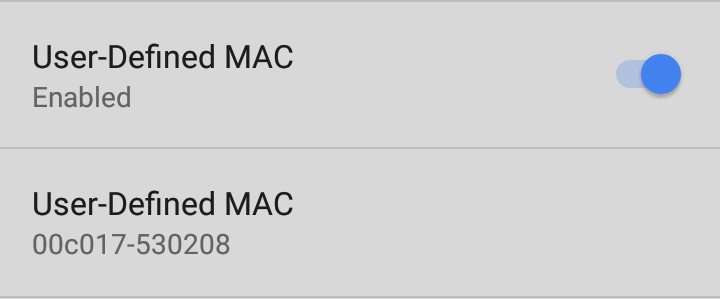
Tap the toggle field to enable a user-defined MAC for the CS Air. This displays the current user-defined MAC definition. (If you have not previously provided a definition, the field shows the factory default MAC address.)
-
To enter a new definition, tap the User-Defined MAC definition, enter a new definition, and then tap OK. When enabled, (User-defined) appears next to the MAC address on the About screen and on relevant test result screens.

 Channel Test Settings
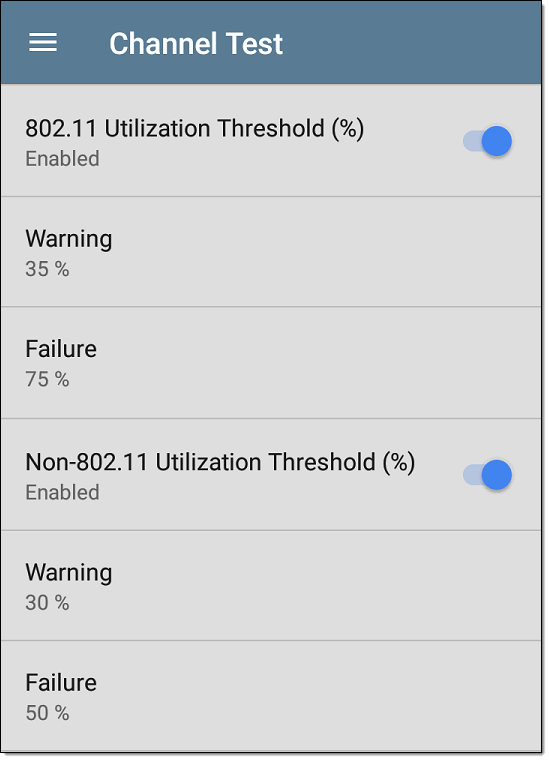
Open Channel Test settings to configure Utilization thresholds for the channel test portion of the Wi-Fi profile.
802.11 Utilization Threshold (%)
This threshold controls the Success/Warning/Fail gradings for the percentage of the connected channel's capacity being used by 802.11 devices.
- Tap the toggle button to enable or disable test grading based on 802.11 utilization.
- Tap Warning or Failure to select or enter custom percentage values for Warning or Failure results.
Non-802.11 Utilization Threshold (%)
This threshold controls the Success/Warning/Fail gradings for the percentage of the connected channel's capacity being used by non-802.11 interference.
- Tap the toggle button to enable or disable test grading based on non-802.11 utilization.
- Tap Warning or Failure to select or enter custom percentage values for Warning or Failure results.
Live Graph Thresholds
Open Live Graph Thresholds to set Warning and Error levels that control the fill color in the Signal/SNR, Utilization, and Transmit Rate (TX) trending graphs on the Wi-Fi Link and Channel Results screens.
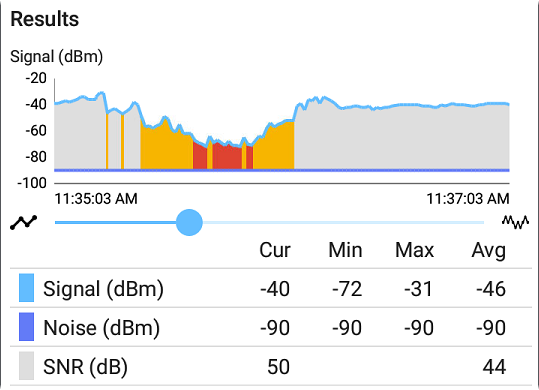
When live graph data exceeds the Warning threshold set on this screen, the affected graph's fill color changes to yellow. When it exceeds the Error threshold, the fill color changes to red. The fill color returns to normal once the value drops below both thresholds.
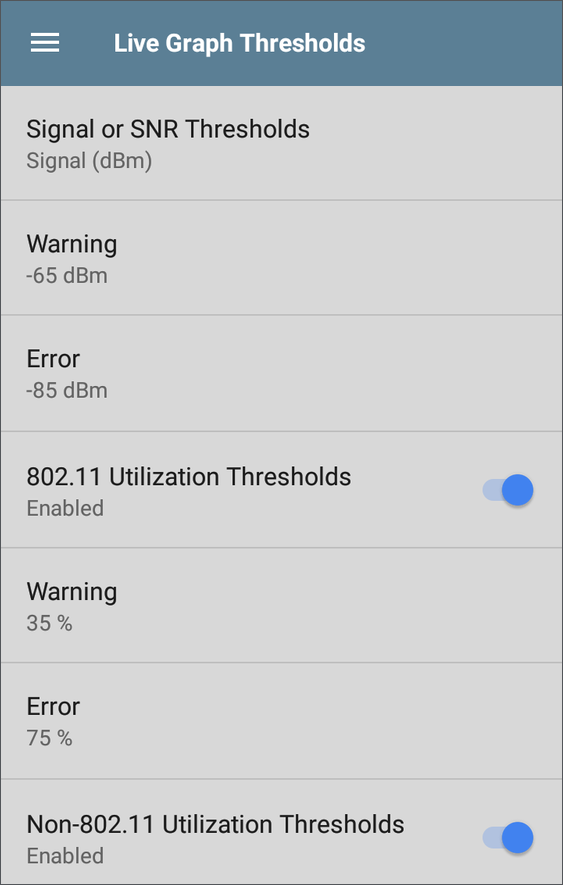
NOTE: These live graph thresholds do not affect the Link Test and Channel Test thresholds that determine test card Pass/Warning/Fail grading.
Signal or SNR Thresholds
When enabled, the grey fill of the Signal/SNR graph changes to yellow or red when the selected measurement exceeds the configured thresholds. Tap to open the Signal or SNR Thresholds screen and configure the following:
- Tap the toggle to enable or disable live graph grading for this group.
- Select whether to grade Signal level or SNR value. Only one can be graded at a time.
- Tap Warning or Error to select or enter custom threshold values.
802.11 Utilization Thresholds
When enabled, the 802.11 portion of the Utilization graph fill changes to yellow or red when 802.11 utilization exceeds the configured thresholds.
Tap the toggle to enable or disable live graph thresholds for 802.11 utilization. Tap Warning or Error to select or enter custom threshold values.
Non-802.11 Utilization Thresholds
When enabled, the non-802.11 portion of the Utilization graph fill changes to yellow or red when non-802.11 utilization exceeds the configured thresholds.
Tap the toggle to enable or disable live graph thresholds for Non-802.11 utilization. Tap Warning or Error to select or enter custom threshold values.
Transmit Rate (TX) Thresholds
When enabled, the Transmit Rate graph fill changes to yellow or red when the TX rate exceeds the configured thresholds.
Tap the toggle to enable or disable live graph thresholds for TX. Tap Warning or Error to select or enter custom threshold values.
IP Configuration (DHCP/Static), DNS, and Gateway Settings
See DHCP, DNS, and Gateway Tests
 Test Targets
Tap the Test Targets field to open the Test Targets screen and add custom Ping, TCP Connect, HTTP, FTP, or Nmap tests to your AutoTest profile. See Test Targets to learn more.
HTTP Proxy
The Proxy control lets you specify a proxy server through which the CS Air establishes a network connection. In AutoTest, these settings are used when HTTP Proxy is enabled in an HTTP or FTP Test Target.
To use the proxy settings with a web browser, run the Profile, and then, open the web browser while the unit remains linked.
Open the HTTP Proxy screen to enable proxy settings.
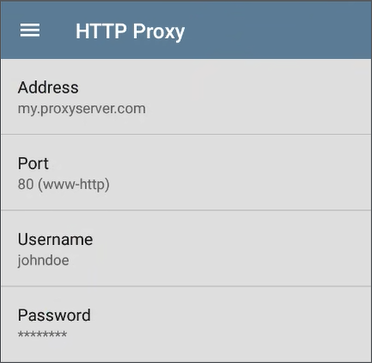
Tap each field to open a pop-up keyboard and enter the appropriate Address (you can enter a proxy name or an address), Port (set to match the proxy port), Username, and Password. Tap OK to save your entries.