AirMapper Settings
Setting up the AirMapper app to perform a survey involves naming the survey, loading a floor plan image, specifying its dimensions, setting scanning mode, and overriding bands and channels.
-
Only .png and .jpg image file types are supported.
-
You may need to use an image editing application to crop your floor plan image to known dimensions, such as the walls of a building or property boundary.
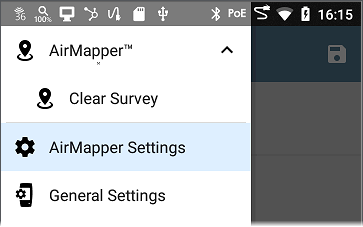
Access the AirMapper settings by selecting the menu icon ![]() or settings icon
or settings icon ![]() at the top of the main app screen.
at the top of the main app screen.
Configuring an AirMapper Survey

Name
Tap the Name field to enter a custom name for your AirMapper project. This name is uploaded to Link-Live to identify this survey project.
Description
Enter any additional information you want for the survey.
Floor Plan
NOTE: You can configure floor plans on Link-Live and then send them to your EtherScope nXG. A notification appears when a new floor plan arrives:
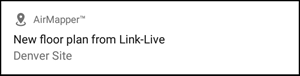
The new floor plan is added to the existing floor plans and is automatically selected if no other survey is currently active.
To select a floor plan:
-
Tap Floor Plan to open the list of available floor plans.
-
Select a floor plan or load a new floor plan by tapping the floating action button
 , using the file selector to navigate to the new map image file, and then tapping the file to select it. This displays the Floor Plan menu.
 -
Fill out the remaining fields for the Floor Plan as needed:

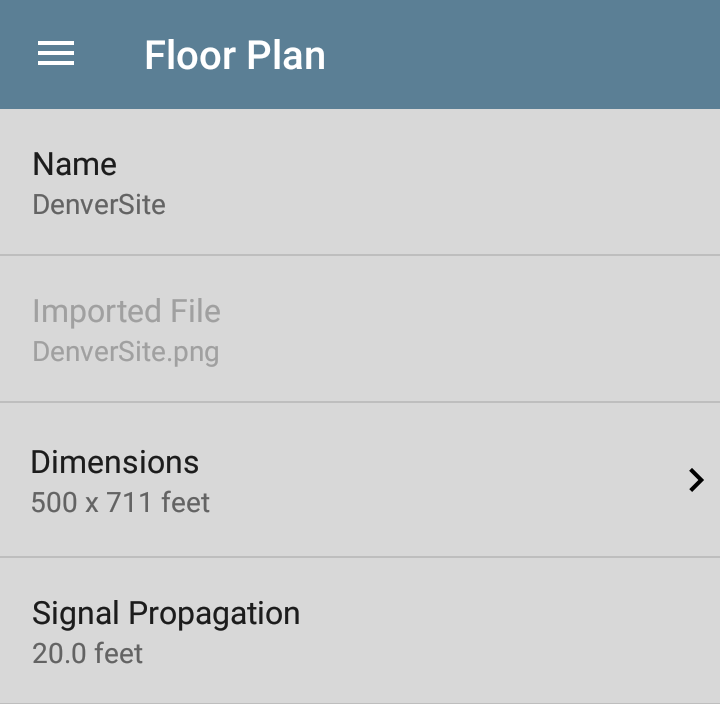
Name: Enter a name for this floor plan. This field defaults to the file name.
Imported File: The original image file name.
Dimensions: Tap this option to display the floor plan with two markers. Move the markers to two places on the floor plan that are a known distance apart. Then tap Marker Distance to enter the distance between the two points. (Set the units (feet or meters) in the General Settings for the test apps, accessed from the left-side navigation drawer ![]() .) When finished, tap
.) When finished, tap  to return to the Floor Plan menu.
Signal Propagation: Tap to enter a value for the propagation radius for the survey sample points.
Signal Level Threshold
This setting designates the minimum signal level at which Wi-Fi devices must be detected for their data to be included in the heatmap. Tap the field to select a new value or enter a custom one. The default of -85 dBm excludes devices with a very low signal. You can enter a custom signal level threshold of -10 to -99 dBm.
NOTE: As of software version 2.8, the new default threshold of -85 dBm excludes device data that was previously included by default on survey heatmaps.
Ping Gateway During Survey
Enabled by default, this setting improves the stability of PHY Tx Rate measurements by automatically running background pings during an AirMapper survey. When you start or resume a survey with this setting enabled, the Ping/TCP app auto-starts and pings the linked interface's default gateway at 10 per second.
-
Pings will use the Frame Size set in the Ping/TCP app.
-
For active, connected surveys, the Ping/TCP app uses the Wi-Fi test port.
-
For passive, scanning surveys, the Ping/TCP app uses the Wi-Fi management port.
-
If the Ping/TCP app is already running when a survey begins, its operation and settings remain unchanged, and it continues running when the Survey ends.
-
Go to the Ping/TCP Test App to view Ping results, adjust settings, or use TCP tests instead.
Survey Mode
Tap Survey Mode to select the Wi-Fi data collection method that best suits your Wi-Fi environment and data collection requirements:
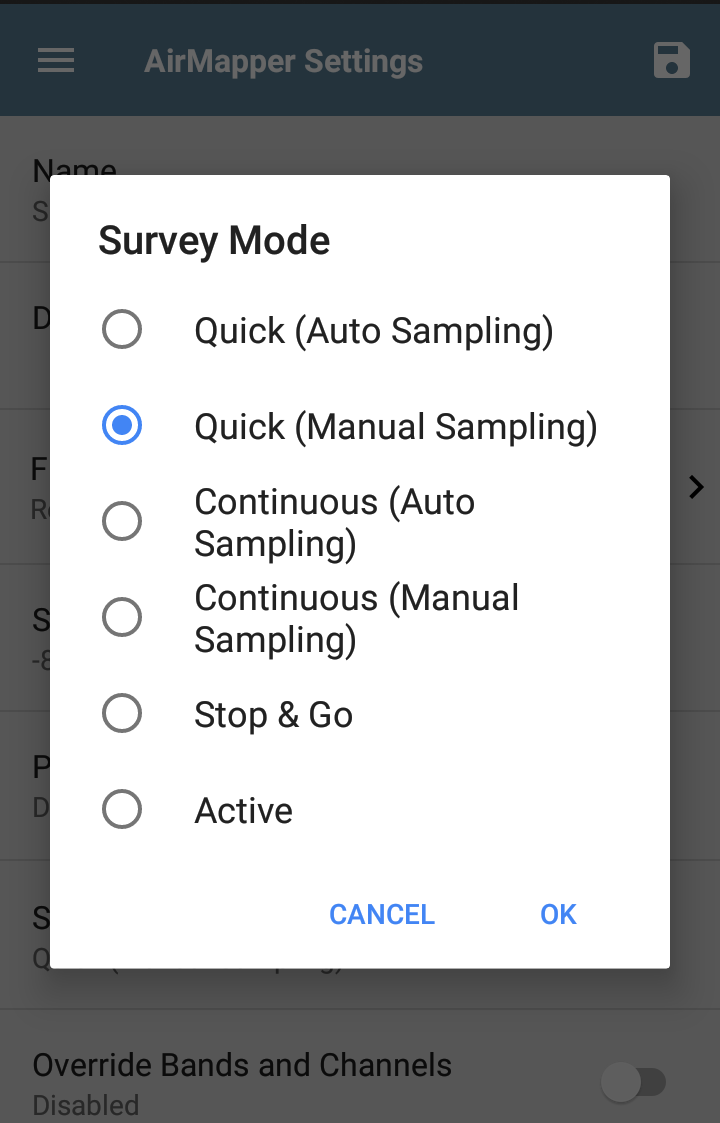
Quick (Auto Sampling)
Quick (Auto Sampling) mode is intended for fast coverage assessments when you need to map access-point presence across a large area. As you move, AirMapper automatically records samples.
In Quick modes, the Wi-Fi radio performs a high-speed scan across all channels without dwelling on each one, so a full scan can complete in only a few seconds. Because no client analysis is performed during this scan type, only access point information is collected.
Quick (Manual Sampling)
Quick (Manual Sampling) provides the same accelerated scan speed but places samples only when you tap the screen. This method allows users to control exactly where sample points are located while still benefiting from reduced survey time. Like Quick (Auto Sampling), only access point data is collected.
Continuous (Auto Sampling)
Continuous (Auto Sampling) is the recommended general-purpose survey mode. To collect data, you place a starting point and an ending point, and AirMapper continuously records data between them at the rate configured in Auto Sampling Period. This method prevents oversampling in long hallways or open spaces and produces a consistent record of AP and client information.
See Collecting AirMapper Data for more information.
Continuous (Manual Sampling)
In Continuous (Manual), AirMapper records data only at the locations you select. The sample reflects the most recent passive scan results collected at that location. Devices age out from the scan history to prevent stale results: access points age out after 140 seconds, and Wi-Fi clients age out after four minutes. This mode allows precise control over where each sample is taken while still gathering full passive survey data.
Stop & Go
Stop & Go provides the most exact point-based data. When you place a sample, the existing BSSID history is cleared, and the tester performs a single scan of the selected channels for the configured dwell time. Only devices that transmit during that window are included, ensuring that each measurement reflects only the RF conditions at that exact moment and location. This method is more time-consuming and may under-represent devices in congested environments or those transmitting less frequently.
Active
Active mode gathers survey information from the active connection on the Wi-Fi Test Port rather than from passive scanning. It reflects the network experience from the perspective of a connected client. When Active mode is selected, passive-scan settings such as Dwell Time and Override Bands and Channels are not used.
NOTE: Selecting this method disables the AirMapper settings for Dwell Time and Override Bands and Channels.
Auto Sampling Period
This setting is enabled for Auto Sampling modes only. Tap to choose a preset sampling period or to enter a custom value. This setting controls how frequently an Auto Sampling survey takes automatic measurements between points that you select manually.
Dwell Time
This setting is enabled for Continuous and Stop & Go survey modes only. Tap to choose a preset dwell time or enter a custom value. See the General Settings for additional information about dwell time.
Override Bands and Channels
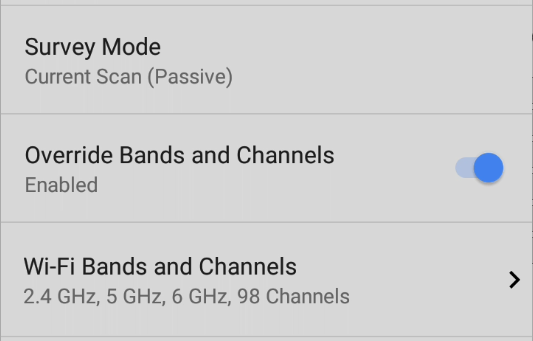
This setting is enabled for all non-Active survey modes. When enabled, Override Bands and Channels instructs AirMapper to use the specified bands and channels for site surveys instead of the channel configuration defined under General Settings. These override selections affect only AirMapper scanning and do not change the tester’s general Wi-Fi settings.
Wi-Fi Bands and Channels
This setting is available when Override Bands and Channels is enabled. Tap to open a list of frequency bands. Then, tap the frequency band to open a menu to select specific channels to use for that band.
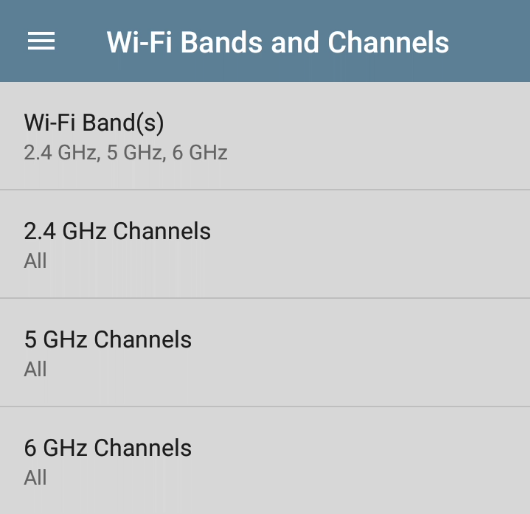
NOTE: Selecting a subset of channels and bands lets you exclude scans of unneeded channels from the survey. This improves survey performance and reduces the amount of data collected.
Changing Settings after Starting
You can reopen the AirMapper settings to change the Floor Plan > Dimensions or Signal Propagation size after starting your survey. Existing data points are retained on the map unless you select a different Floor Plan.
NOTE: NetAlly does not recommend that you change the band, channel, or dwell time settings after you have started a survey. The survey results for the multiple settings can create confusing or less reliable results.
Hidden SSIDs and APs
For any [Hidden] APs or SSIDs at your site that you want detected during a survey, NetAlly recommends creating and enabling a Wi-Fi Profile in the AutoTest app, configured with the appropriate credentials. Otherwise, AirMapper detects the BSSIDs associated with hidden devices but may not determine their APs/SSIDs.