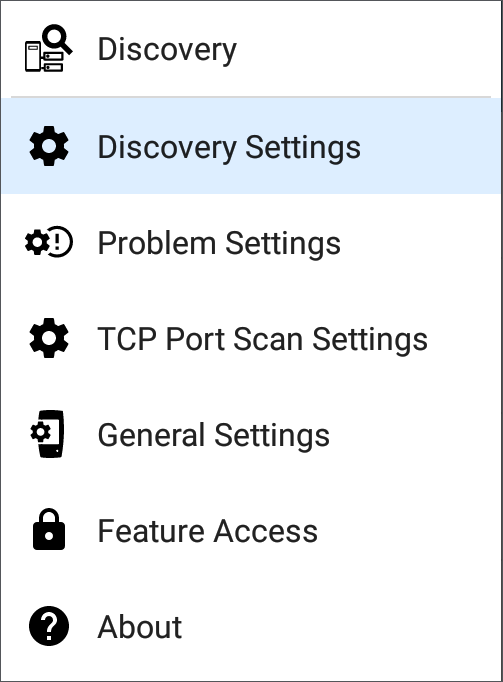
Discovery Settings
Discovery configurations include SNMP settings, Community Strings and the order in which they are used, Credential Sets, Ports, Extended Ranges, and process intervals.
In this Topic
Access the Discovery settings screen by sliding out the left-side navigation drawer or tapping the menu icon ![]() , and selecting Discovery Settings.
, and selecting Discovery Settings.
(Tap here to skip to Problem Settings, TCP Port Scan, or back to General Settings.)
To adjust Discovery Settings:
-
On the Discovery Settings screen, tap each field described in this topic, as needed, to select or enter your required configuration elements.
-
When you finish configuring, tap the back button
 to return to the main Discovery List screen.
 -
Then, Refresh Discovery from the action overflow menu
 to apply the new configuration.
You can load, save, import, and export configured Discovery settings by tapping the save button  on this screen.
-
Load opens a previously saved Discovery configuration.
-
Save As saves the current configuration with an existing name or a new custom name.
-
Import: Import a previously exported settings file.
-
Export Selected or Export All: Create an export file of current settings, and save it to internal or connected external storage.
See Managing Testing App Settings for more instructions.
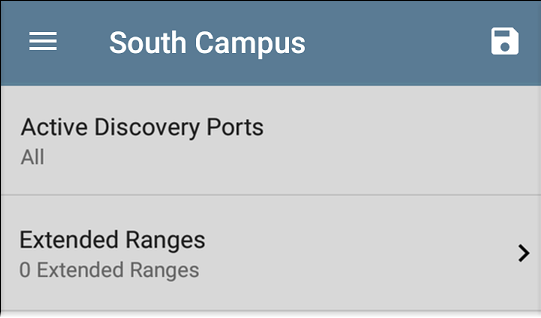
After you have saved a configuration, the custom name you entered appears in the title of the Discovery Settings screen. In the image below, a user has saved a custom configuration named "South Campus," which replaces the "Discovery Settings" screen title.
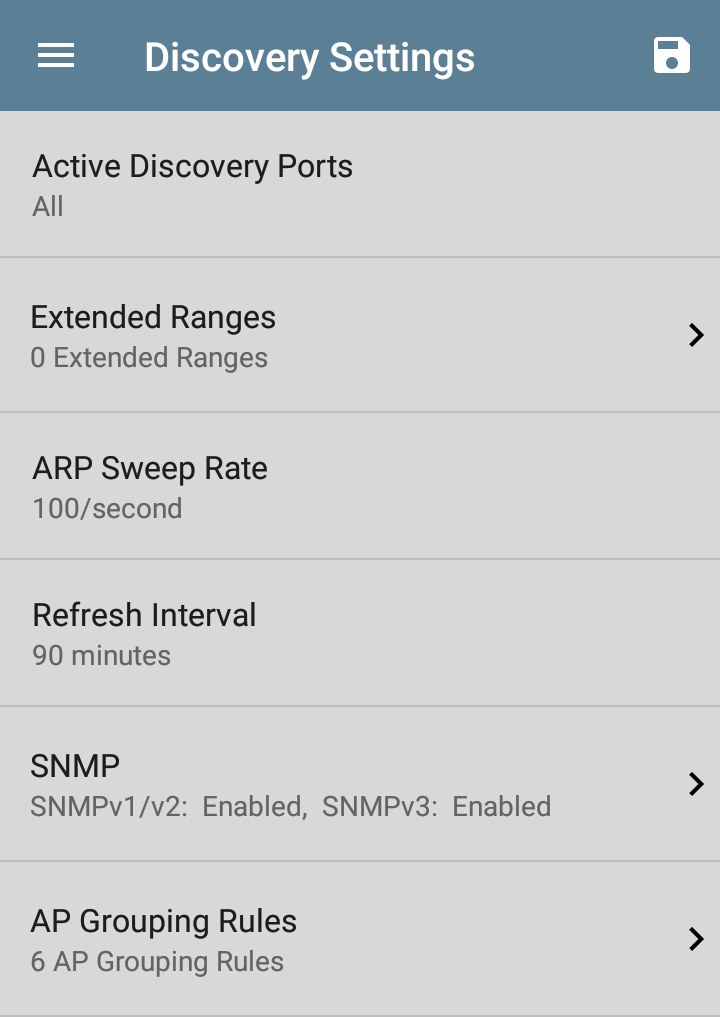
Active Discovery Ports
Tap Active Discovery Ports to select which port Discovery uses to gather data. (Discovery uses all of the ports by default. Uncheck them to limit which ports are used.) Discovery runs through the enabled ports only if an active network link is available. See Selecting Ports for explanations of the different ports.
Extended Ranges
The Extended Ranges screen allows you to enter addresses of non-local subnets on which you want the Discovery process to run. Discovery sweeps all of the enabled Extended Ranges for devices, whether directly connected or off-net. The EtherScope performs Ping sweeps on subnets that are not directly connected and ARP sweeps on connected subnets.
When the SNMP agents are on a subnet that is separate from the hosts (PC's and servers) subnet, additional networks must be configured for discovery:
-
The network address of the remote subnet you want to discover, meaning the host (PC and server) network.
-
The network address of the switch and router SNMP agents in the remote subnet, e.g. a management subnet.
Configure both SNMP Credential Sets and Extended Ranges to ensure that the EtherScope always discovers management subnets, regardless of your network port connections.
Tap the field to open the Extended Ranges list screen.
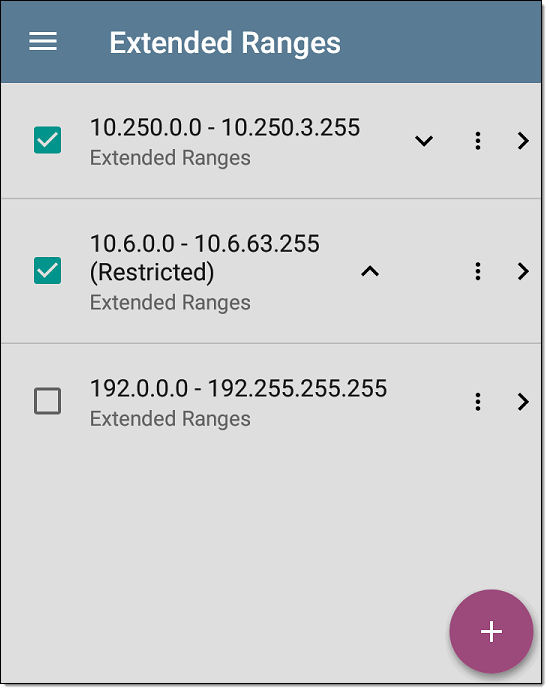
-
Check or uncheck the boxes to include or exclude an extended range from the current Discovery configuration. Unchecked Extended Ranges do not affect the default Discovery behavior in the current configuration, but they may be used in other Discovery configurations (like Community Strings and Credentials).
-
Tap any Extended Range's row to edit its address and subnet.
-
Tap the FAB
 to add new extended ranges.
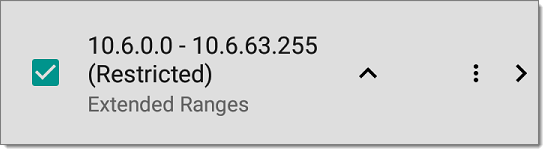
Active vs. Restricted Subnets
For each configured Extended Range, you can tap the toggle button to switch from Active to Restricted. Discovery is performed on Active Ranges. Setting a Range to Restricted disables the discovery process on that network or subnet, meaning the EtherScope will not communicate with devices within the restricted range.
-
Restricted Ranges take precedence regardless of the order in which they are listed on the Extended Ranges screen.
-
You can Restrict a part of a configured Active Extended Range.
-
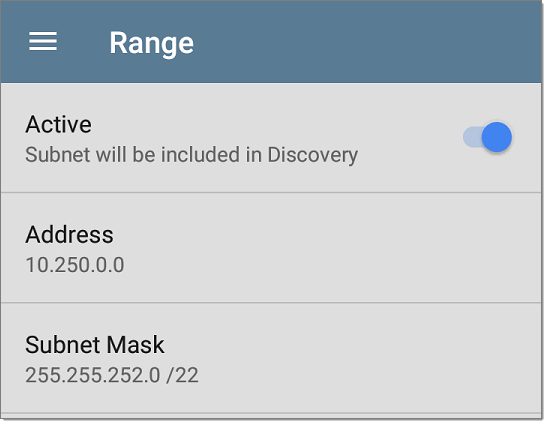
You can also restrict a single device, whether it is part of an Active Range or not. To enter a single device that you do not want discovered, enter its IP address in the Address field, and set the Subnet Mask field to 255.255.255.255.
Address
Tap the Address field to enter or select an IP address range.
Tap the drop-down menu to select a previously Discovered Subnet. The Address field is automatically populated with your selection.
Subnet Mask
Tap this field to select a subnet mask. If you select an already Discovered Subnet, the Subnet Mask is also pre-populated.
ARP Sweep Rate
Tap the ARP Sweep Rate field to select a rate between 5 and 100 ARP requests per second.
This setting can prevent the EtherScope from shutting down ports that sense too many ARPs being sent.
Refresh Interval
This setting controls the time between runs of the Discovery process. By default, Discovery runs every 90 minutes. Tap the Refresh Interval field to select a different interval, up to 8 hours.
The Manual option turns off regular automatic Discovery, and the process refreshes only if you select Refresh Discovery from the main Discovery list screen.
SNMP Configuration
The MIB (Management Information Base) of SNMP managed devices contains information such as device configuration, interface configuration and statistics, SNMP tables (like host resource and route tables) and VLAN details. Through the Discovery process, the EtherScope interrogates MIBs to determine the device type, ports, connected subnets, and other data.
SNMP credentials are required to communicate with the SNMP agents on your interconnect devices, such as switches and routers. The Discovery Settings allow you to enter the SNMP community strings and credential sets the EtherScope uses to communicate with those devices.
SNMPv1/v2
Tap the toggle button to enable or disable SNMPv1 and v2 queries. This setting is enabled by default and uses the Community Strings configured in the next setting.
Community Strings
Tap this field to open the Community Strings list screen and add, edit, or remove community strings.
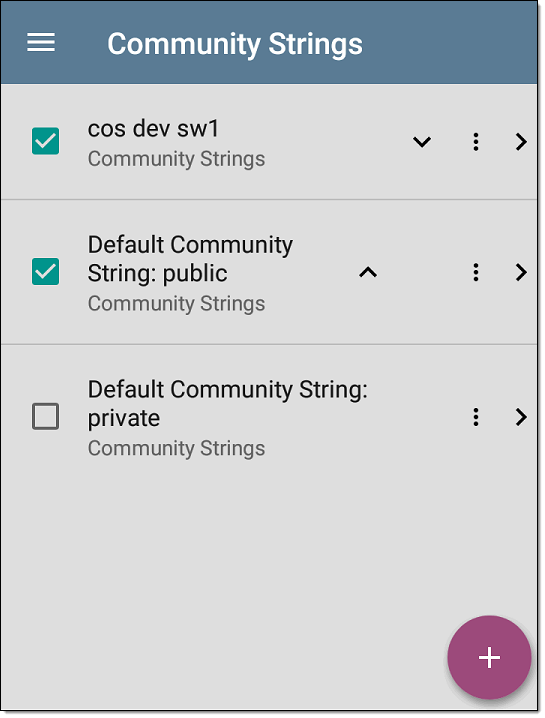
The EtherScope uses the checked strings in the order shown on this screen. If it does not receive a response from the queried device using one string, it sends the next string.
On the Community Strings screen, you can perform these actions:
-
Check or uncheck the boxes to include or exclude a string from use in the current Discovery configuration.
-
Tap the up and down arrows
 to change the order in which the EtherScope uses the strings to query a device.
 -
Tap the action overflow icon
 to Duplicate or Delete a Community String.
CAUTION: Deleting a string removes it from all saved Discovery configurations. To remove a string from the current Discovery configuration only, simply uncheck it. -
Tap the FAB
to add new Community Strings. -
Tap any Community String's row to edit the string and its description.
SNMPv3
Tap the toggle button to enable or disable SNMPv3 queries. This setting is enabled by default and uses the Credentials configured in the next setting.
Credentials
Tap this field to open the Credentials list screen.
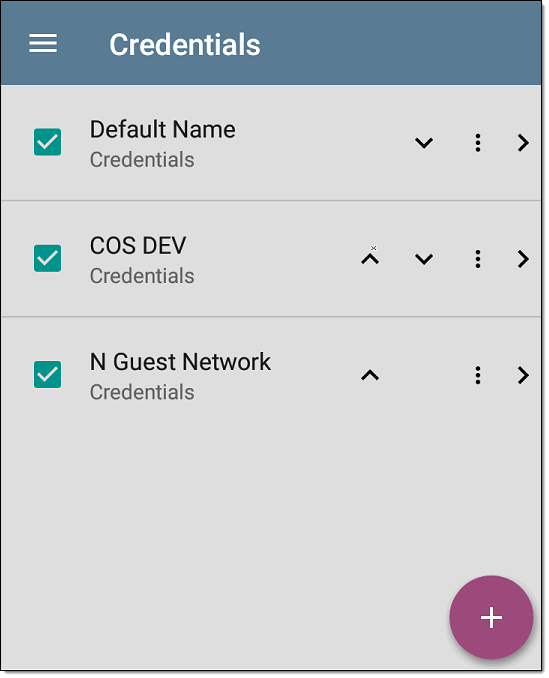
This screen interface works like the Community Strings screen above. EtherScope uses the Credentials in the order shown.
-
Check or uncheck the boxes to include or exclude a set of Credentials from use in the current Discovery configuration.
-
Tap a row to edit its credentials.
-
Tap the FAB
to add new credentials.
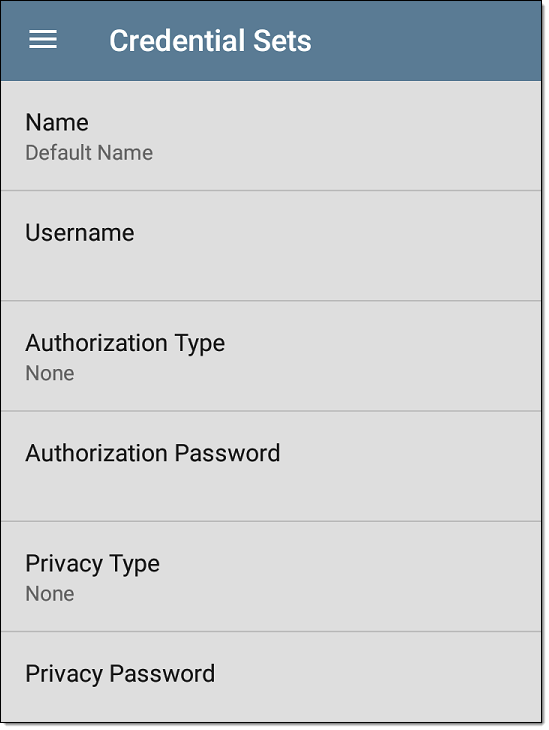
On the Credentials Sets screen, tap each field to select or enter the credentials required.
Name
Tap the Name field to enter a custom name for the Credential Set.
Username
Tap to enter the SNMPv3 username.
Authorization Type and Password
EtherScope Discovery supports two SNMPv3 Authorization types: HMAC-SHA and HMAC-MD5. If Authorization is required, enter the appropriate password.
Privacy Type and Password
EtherScope Discovery supports four Privacy Types: CBC-DES, AES-128, AES-192, AND AES-256. If needed, enter the appropriate Privacy Password.
SNMP Query Delay
This function controls how long your EtherScope waits between SNMP queries to key tables that can cause CPU spikes in the SNMP agents, including the ARP cache, IP address table, routing tables, and FDB tables.
The default SNMP Query delay is No Delay. When querying the key large tables, the EtherScope asks for more data as soon as a response has been received. You can select a 1 or 5 second delay if needed.
Devices Discovered Through Other Devices
By default, EtherScope discovers devices from SNMP tables of other devices. If you do not want Discovery to automatically find devices from SNMP tables of the device types listed here, you can uncheck their boxes.
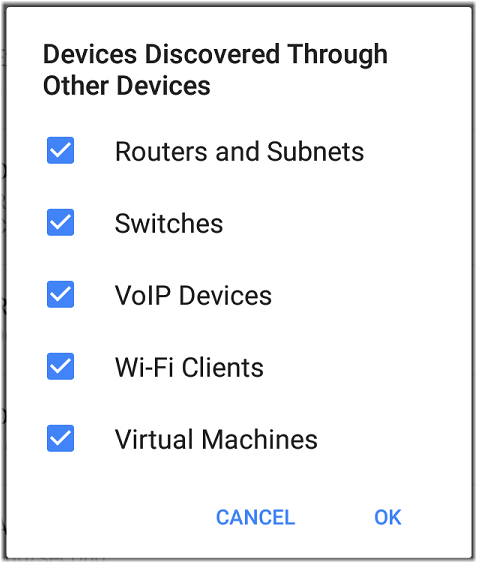
Routers and Subnets
When the Routers and Subnets checkbox is enabled, any discovered routers are included in discovery results. In addition, if Discovery has SNMP access to a discovered router, its routing tables are read, and the next hop routers are added to the Discovery list. If any local subnets are available in the routing tables, these are also added to the Subnets list. This process continues until all the available SNMP credentials are tried for the added routers.
Switches
When the Switches checkbox is enabled, discovery adds any switches that it finds in SNMP neighbor tables of other devices to the Discovery list.
For example, when EtherScope is reading the CDP and LLDP caches of one switch, it contains other switches. If this option is enabled, the EtherScope adds those other switches, even if they are not in discovery ranges.
VoIP Devices
When the VoIP Devices checkbox is enabled, discovery adds any VoIP devices that it finds in SNMP tables of other devices regardless of the subnet. These are usually found in the LLDP-MED tables of the switches. Enabling the Switches option provides the best chance of finding all your VoIP devices.
Wi-Fi Clients
When the Wi-Fi Clients checkbox is enabled, discovery adds any wireless clients it finds in SNMP tables of APs and Wireless LAN Controllers. Enabling this option along with Switches provides best chance of finding all Wi-Fi clients.
NOTE: Enabling Wi-Fi Clients here may cause Wi-Fi devices to show in Discovery that do not appear in the Wi-Fi analysis app because Wi-Fi analysis only shows what it detects on wirelessly transmitted packets.
Virtual Machines
When the Virtual Machines checkbox is enabled, discovery adds any virtual machines that it finds in SNMP tables of other devices. These are usually found in the ESX host > SNMP tables. Adding the subnets of your ESX hosts to Extended Ranges helps with finding your virtual machines.
Device Health Interval
Discovery automatically runs a set of network health tests to search for network Problems, such as high utilization, discards, or errors on all discovered interfaces and device resources.
The selected time Refresh Interval is the minimum time between each run of the Device Health tests. Tap the field to disable Device Health testing or to change the interval from the default of 10 minutes to 30 or 60 minutes.
Disabling the Device Health testing affects the types of Problems that Discovery can detect.
See also Problem Settings.
Auto AP Grouping Rules

This feature allows you to adjust the AP Grouping Rules that control how the EtherScope groups BSSIDs with their Access Points, such that they are grouped appropriately for your AP types and environment.
For example, if BSSIDs from different APs are being grouped together inaccurately, you can disable the rule that is causing the grouping. If your AP manufacturer uses a BSSID variation scheme that is not covered by one of the six default rules, you can add a new rule.
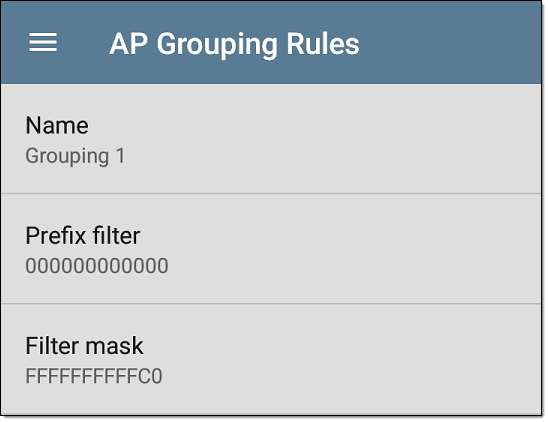
Tap the setting to open the AP Grouping Rules list screen. The image below shows the six default AP Grouping Rules on the EtherScope. The Prefix filters in all of the default grouping rules are set to 000000-000000.

As with other settings list screens, you can enable or disable, add, delete, and edit the grouping rules from this screen.
-
Check or uncheck the boxes to include or exclude a rule from use in the current Discovery configuration.
-
Tap the action overflow icon
to Duplicate or Delete a rule.
CAUTION: When you delete a rule, you delete it from all saved Discovery configurations. To remove a rule from those used by the current Discovery configuration, simply uncheck it. -
Tap the FAB
to add a new rule. -
Tap any rule's row to edit it.
Name
If desired, enter a custom name for a default or new rule. If you intend to use a Prefix filter, a best practice would be to name the rule with the AP manufacturer's name.
Prefix filter
Use the Prefix filter to create a rule for a specific AP manufacturer's BSSID scheme, meaning a rule for just one AP manufacturer prefix. The default rules all contain a default Prefix filter of 000000-000000.
If a Prefix filter is non-zero, its second and third bytes are compared to discovered BSSIDs before the Filter mask (described below) is applied. These two bytes must match exactly, or the two BSSIDs are not grouped together. This behavior allows you to specify a fairly open Filter mask, because the mask applies only to one manufacturer.
For example, you could have Cisco APs with BSSIDs that all start with b83861. By specifying a Prefix filter of 003861-000000, you limit the grouping rule to just those APs.
Filter mask
The Filter mask specifies what parts of the BSSIDs are compared when determining AP groupings.
For example, default Grouping Rule 1 has a Filter mask of FFFFFF-FFFFC0, so any BSSIDs that vary only by the lower six bits are grouped together.