The Periodic AutoTest feature on the EtherScope® nXG, AirCheck® G3, and the LinkRunner® 10G provides a means to get to the root of intermittent connectivity problems. With the ability to automatically run AutoTests on a specific interval for up to 24 hours, you can quickly determine which services are losing connectivity and when they are having problems.
First, a quick overview of AutoTests. When you first select the AutoTest app on the EtherScope® nXG or the LinkRunner® 10G you see all of the AutoTests that will be run as part of the AutoTest group. This allows you to build a custom combination of wired and wireless tests. Each of these tests checks connectivity to key resources such as DHCP and DNS servers, as well as the default router and selected test targets.
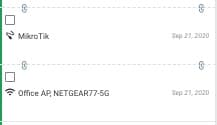
Below is an example of an AutoTest group that tests several VLANs and wireless connectivity.

We can see that the EtherScope® nXG was able to successfully run each of the tests in each of the AutoTests. As each AutoTest completed, the results were uploaded to Link-Live. Each of the AutoTests in the group are linked together within Link-Live.
This test gives us a point-in-time view of the availability of each of the network resources referenced in the AutoTests. To troubleshoot intermittent problems, we need to run this AutoTest group on a regular interval, over a period of time. This is when the Periodic AutoTest comes in. The first step in enabling Periodic AutoTest is to tap on the settings icon at the top of the AutoTest group screen. From here, tap on Periodic AutoTest. Then tap the switch to enable Periodic AutoTests. This will display the configuration options
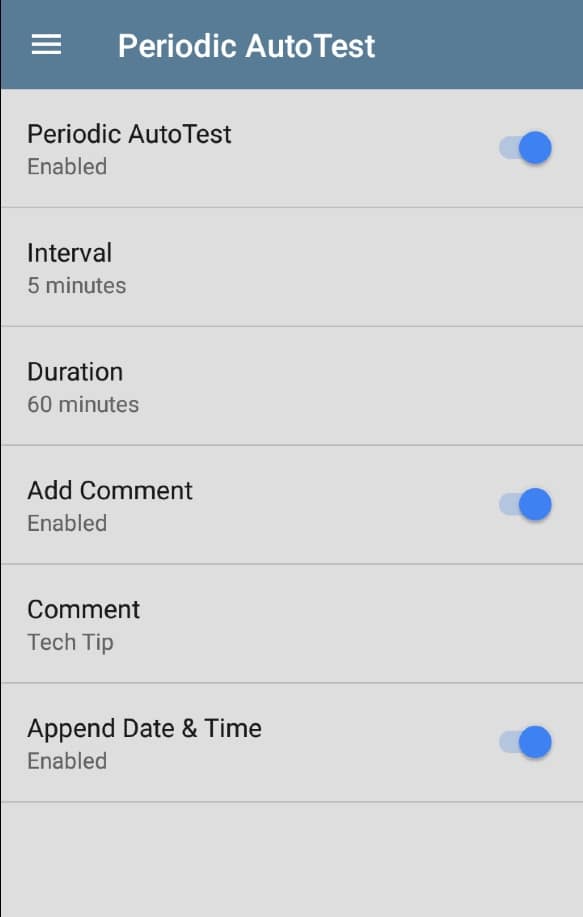
The following parameters may be configured:
Interval – This is the interval between start of each AutoTest. This can be set as low as one minute and as high as 60 minutes. It is important to make this value long enough the current AutoTest can be complete before the next one is started. In the example, at the beginning of this tip, the AutoTest group took 2 minutes and 35 seconds to complete. In this case, a good interval would be 5 minutes.
Duration – This sets the length of the Periodic AutoTest. This value may be set to between 10 and 24 hours. The Periodic AutoTest will be run on the selected interval for this period.
Add Comment – This comment will be added to each of the completed AutoTests. Comments provide an easy means to search for specific test results or groups of test results. In this case, we could search for “Tech Tip” and find all of the AutoTest results run as part of this test.
Comment – This is the comment that will be added to each of the completed AutoTests.
Append Date & Time – The time and date when the first AutoTest for the Periodic AutoTest was run will be appended to each of the comments. For example, if the first test was run on September 21, 2020, at 4:56: 24 pm, 20200921_165624 will be appended to each of the test results.
As the test is running, the status is displayed at the bottom of the AutoTest group screen.
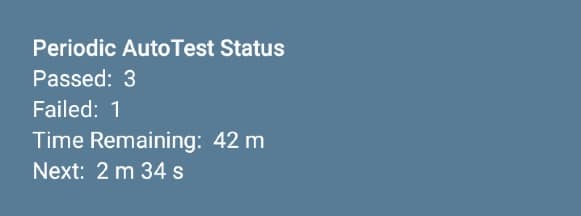
In the status above, we can see that one of the AutoTests failed. To determine which test failed we can go to Link-Live and look at the results.

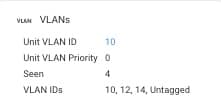
In this case, we have searched for the comment attached to each of the Periodic AutoTests and specified we only want to see failures. Based on this filter, we find the one AutoTest that failed. The results show us this was the VLAN10 test.
And the test that failed was the TCP connectivity test to our e-mail server on TCP port 465.

We now know when the problem occurred, which VLAN had problems, and the test target that failed. This is much better than “the network is having problems around 5 o’clock”!
Using the Periodic AutoTest feature of the EtherScope® nXG and the LinkRunner® 10G allows you to deploy the analyzer out to the problem location and monitor network resources over a period of time. Once you know exactly what is having problems and when it is having problems, it makes it much easier to get to the root of the problem.